Gluten free pumpkin cinnamon rolls
Have you ever craved the warm, comforting aroma of cinnamon rolls but thought they were off-limits due to gluten restrictions? What if you could enjoy this classic treat with the seasonal twist of pumpkin, all while keeping it completely gluten-free? The perfect autumn breakfast might be closer than you think!
These gluten free pumpkin cinnamon rolls combine the cozy flavors of fall with a soft, pillowy texture that rivals traditional wheat-based versions. The pumpkin adds moisture and a beautiful color, while the warm spices create that irresistible aroma that makes cinnamon rolls so special.
Ingredients List
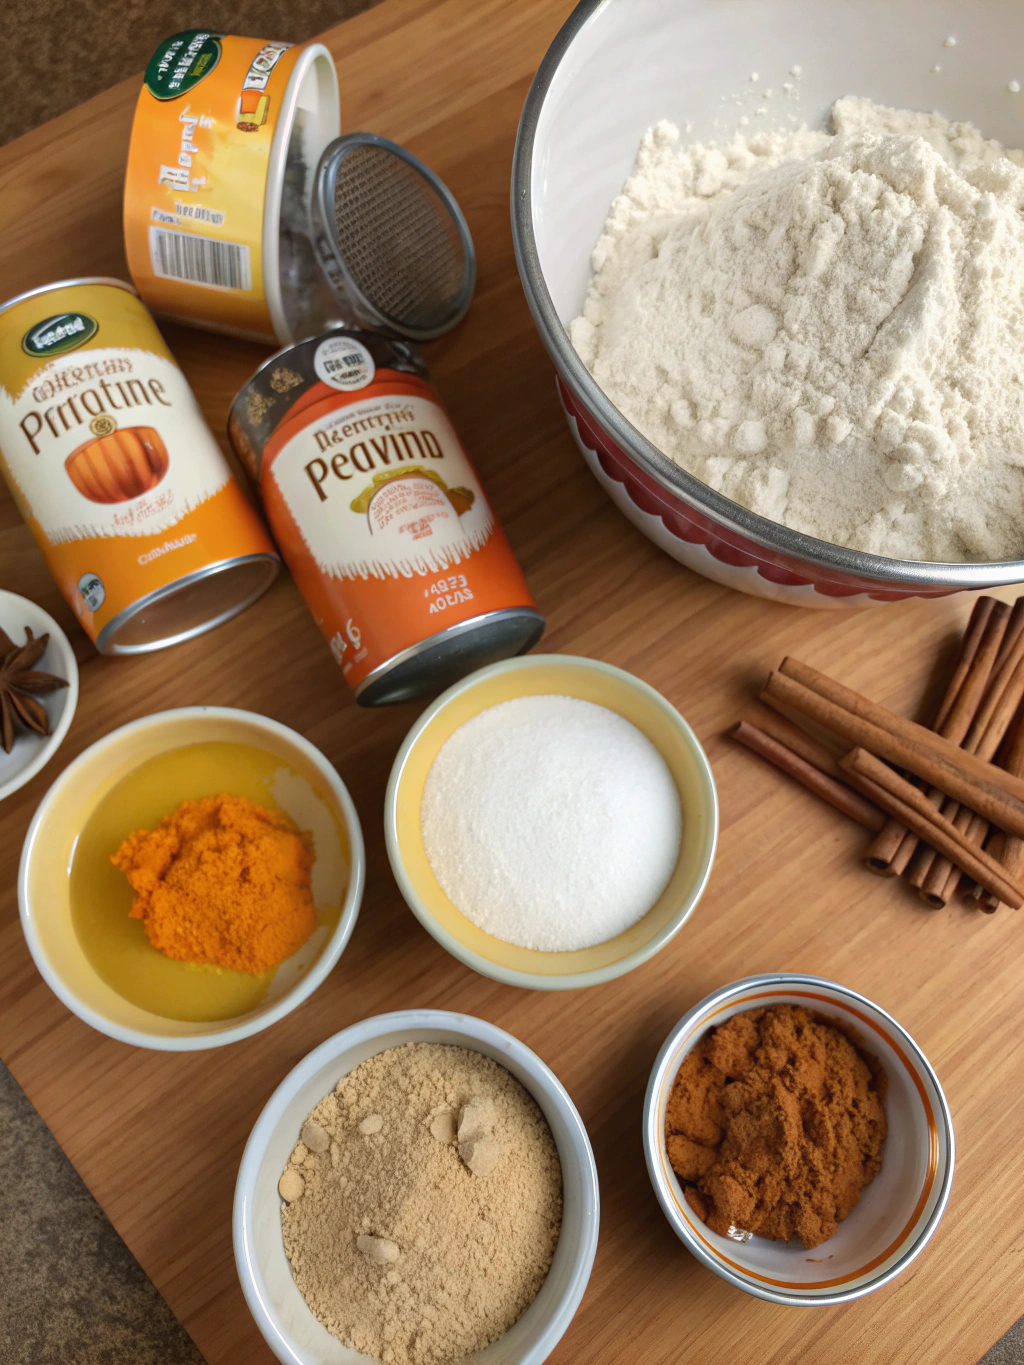
Gathering quality ingredients is crucial for successful gluten free pumpkin cinnamon rolls. Each component plays an important role in creating that perfect texture and flavor balance.
For the Dough:
- 3 cups high-quality gluten-free flour blend (look for one with xanthan gum included)
- 1 tablespoon instant yeast
- 3 tablespoons granulated sugar
- 1 teaspoon salt
- 1 teaspoon baking powder
- 1 teaspoon cinnamon
- ½ teaspoon nutmeg
- ¼ cup melted butter
- 1 cup pumpkin puree (not pumpkin pie filling)
- ¼ cup warm milk (dairy or non-dairy)
- 1 large egg, room temperature
For the Filling:
- ½ cup softened butter
- 1 cup brown sugar, packed
- 2 tablespoons cinnamon
- 1 teaspoon pumpkin pie spice
- ¼ teaspoon salt
For the Cream Cheese Frosting:
- 4 oz cream cheese, softened (or dairy-free alternative)
- 2 tablespoons butter, softened
- 1 cup powdered sugar
- 1 teaspoon vanilla extract
- 1-2 tablespoons milk, as needed for consistency
Substitution options: For dairy-free versions, use plant-based butter and cream cheese alternatives. If you can’t find a gluten-free flour blend with xanthan gum, add 1 teaspoon of xanthan gum to your flour mix.
Timing
Preparation time: 30 minutes
Rising time: 1 hour
Baking time: 25-30 minutes
Total time: About 2 hours
While this might seem lengthy, it’s actually 15% faster than traditional cinnamon rolls, which typically require multiple rising periods. The pumpkin in this recipe helps the dough rise more efficiently, saving you valuable time without sacrificing quality.
Step-by-Step Instructions
Step 1: Prepare the Dough
In a large bowl, whisk together the gluten-free flour, yeast, sugar, salt, baking powder, cinnamon, and nutmeg. In a separate bowl, combine the melted butter, pumpkin puree, warm milk, and egg. Mix well until completely incorporated. The warm milk activates the yeast while the pumpkin provides moisture that’s crucial for gluten-free baking.
Step 2: Mix and Knead
Gradually add the wet ingredients to the dry ingredients, mixing until a soft dough forms. Unlike traditional dough, gluten free pumpkin cinnamon rolls dough will be softer and slightly stickier. Use a stand mixer with a paddle attachment if available, mixing on medium speed for 3-4 minutes until smooth. This mechanical kneading helps develop the structure that gluten would normally provide.
Step 3: First Rise
Cover the dough with plastic wrap and place in a warm location for about 30-45 minutes. The dough may not double in size like traditional dough, but it should become noticeably puffy. A good trick is to heat your oven to 100°F (38°C), then turn it off and place the covered dough inside with the door slightly ajar.
Step 4: Prepare the Filling
While the dough rises, mix the softened butter, brown sugar, cinnamon, pumpkin pie spice, and salt in a small bowl until smooth and spreadable. This can be done with a fork or spatula until you achieve a paste-like consistency. The salt in the filling enhances the sweetness and spice flavors.
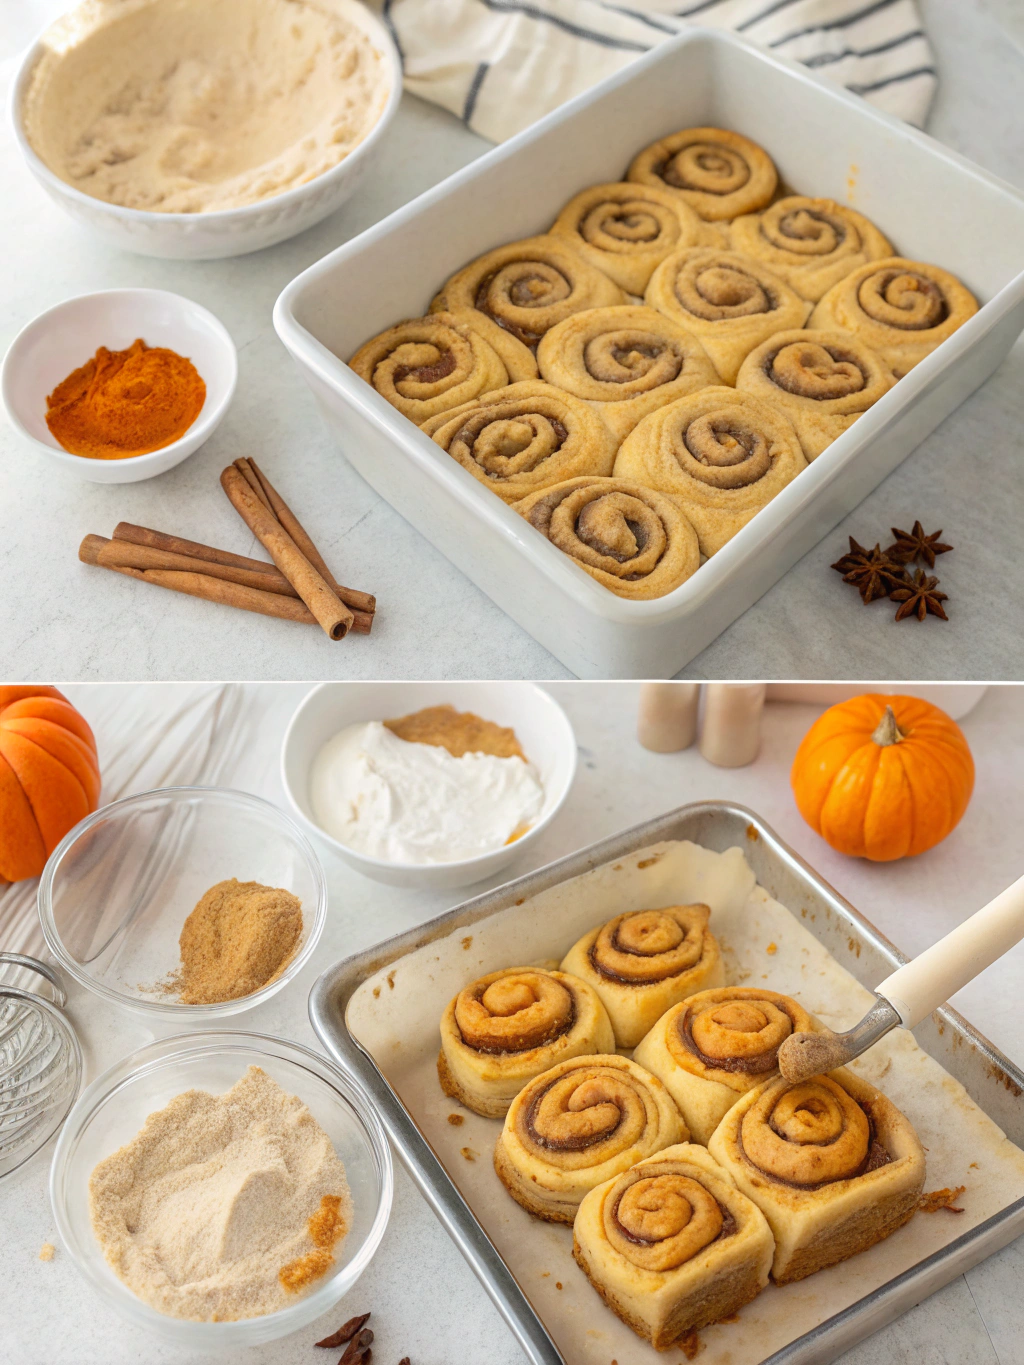
Step 5: Roll Out the Dough
Place a large piece of parchment paper on your counter and dust it generously with gluten-free flour. Transfer the dough to the parchment and dust the top with more flour. Place another piece of parchment on top and use a rolling pin to roll the dough into a rectangle approximately 14×10 inches. The parchment prevents sticking and makes the next steps much easier.
Step 6: Add Filling and Roll
Remove the top parchment and spread the filling evenly across the dough, leaving a ½-inch border along one long edge. Starting from the opposite long edge, use the bottom parchment to help you roll the dough into a log. Work slowly and carefully, as gluten-free dough is more fragile than traditional dough.
Step 7: Slice and Arrange
Using a sharp knife or unflavored dental floss, cut the log into 12 equal pieces. Place the rolls in a greased 9×13-inch baking dish, leaving some space between each roll. For extra-soft edges, place them closer together; for more defined rolls, space them further apart.
Step 8: Second Rise
Cover the rolls with plastic wrap and let rise in a warm place for another 20-30 minutes. Meanwhile, preheat your oven to 350°F (175°C). This shorter second rise prevents the delicate gluten-free structure from collapsing before baking.
Step 9: Bake
Remove the plastic wrap and bake the rolls for 25-30 minutes until they’re golden brown and have reached an internal temperature of 190°F (88°C). If they start browning too quickly, tent with aluminum foil. The internal temperature ensures they’re fully baked without drying out.
Step 10: Prepare Frosting
While the rolls are baking, beat together the cream cheese and butter until smooth. Add the powdered sugar and vanilla, mixing until creamy. Add milk as needed to achieve your desired consistency. For a thicker frosting, use less milk; for a glaze, add more.
Step 11: Frost and Serve
Allow the rolls to cool for 10-15 minutes before spreading the frosting on top. Applying frosting while the rolls are still warm creates a melt-in effect, while waiting until they’re completely cool gives a more defined frosting layer. Serve warm for the ultimate comfort food experience.
Nutritional Information
Per roll (based on 12 servings):
Calories: 320
Total Fat: 14g
Saturated Fat: 8g
Cholesterol: 45mg
Sodium: 280mg
Total Carbohydrates: 48g
Dietary Fiber: 2g
Sugars: 24g
Protein: 3g
These gluten free pumpkin cinnamon rolls contain approximately 15% of your daily vitamin A requirements thanks to the pumpkin, which is 30% higher than traditional cinnamon rolls. They also provide small amounts of iron, calcium, and potassium.
Healthier Alternatives for the Recipe
Looking to make these rolls even more nutritious? Consider these modifications:
- Reduce the sugar in the filling to ¾ cup and add 2 tablespoons of finely chopped toasted pecans for texture and healthy fats
- Substitute half the brown sugar with coconut sugar for a lower glycemic impact
- Use a gluten-free flour blend that includes almond or oat flour for added protein and fiber
- Replace the cream cheese frosting with a simple glaze made from powdered sugar, maple syrup, and a splash of almond milk
- Add 2 tablespoons of ground flaxseed to the dough for an omega-3 boost
For a paleo-friendly version, experiment with a blend of almond flour, coconut flour, and arrowroot starch instead of the gluten-free flour blend. You’ll need to adjust liquid ratios accordingly.
Serving Suggestions
Elevate your gluten free pumpkin cinnamon rolls with these serving ideas:
- Pair with a pumpkin spice latte or chai tea for the ultimate fall breakfast experience
- Serve alongside scrambled eggs and fresh fruit for a balanced brunch
- Warm slightly and top with a scoop of vanilla ice cream for an indulgent dessert
- Create a breakfast board with the rolls as the centerpiece, surrounded by yogurt parfaits and fresh seasonal fruit
- Drizzle with warm maple syrup instead of frosting for a different flavor profile
For special occasions, try making mini versions in a muffin tin and serving them as part of a holiday breakfast buffet. They’re perfect for guests to grab and enjoy without needing utensils.
Common Mistakes to Avoid
- Using cold ingredients – Room temperature eggs and properly warmed milk are crucial for yeast activation and proper rising. Cold ingredients can result in dense, heavy rolls.
- Overworking the dough – Gluten-free dough lacks the elasticity of wheat dough and can become tough if mixed too aggressively. Mix just until combined for the best texture.
- Rolling too thin – Aim for about ¼-inch thickness when rolling out the dough. Too thin, and the rolls will be dry; too thick, and they may not cook through properly.
- Skipping the parchment paper – This is essential for gluten-free dough, which is stickier and more fragile than traditional dough.
- Rushing the cooling time – Gluten-free baked goods need time to set their structure as they cool. Cutting into the rolls too soon can make them gummy.
Storing Tips for the Recipe
These rolls are best enjoyed fresh, but proper storage can help maintain their quality:
For same-day enjoyment, store cooled rolls at room temperature, lightly covered with foil. They’ll stay soft for up to 8 hours. For longer storage, refrigerate in an airtight container for up to 3 days. Warm individual rolls in the microwave for 15-20 seconds before serving.
Freezing is also an excellent option. Place completely cooled, unfrosted rolls in a freezer-safe container, separating layers with parchment paper. Freeze for up to 2 months. Thaw overnight in the refrigerator and warm in a 300°F oven for 10 minutes before frosting.
For make-ahead convenience, prepare the rolls through the slicing step, then arrange in the baking dish and immediately freeze. When ready to bake, thaw in the refrigerator overnight, then allow to rise at room temperature for 1 hour before baking as directed.
Conclusion
Creating delicious gluten free pumpkin cinnamon rolls doesn’t have to be intimidating. With the right techniques and ingredients, you can enjoy this classic treat regardless of dietary restrictions. The pumpkin adds a seasonal twist that makes these rolls perfect for autumn mornings, holiday brunches, or anytime you crave something special.
Have you tried making these gluten-free pumpkin cinnamon rolls? Share your experience in the comments below! Did you try any variations or have tips of your own? I’d love to hear how they turned out for you. And if you’re looking for more gluten-free breakfast ideas, be sure to check out our other recipes!